
Last Updated: 5th March 2021
Systems Manual
Table of Contents
About this Manual
Introduction
Congratulations on purchasing a PSIO Cartridge! We hope that your PlayStation console will provide you with many more years of entertainment, and with PSIO, that is guaranteed.
PSIO began as a concept in August 2010. Development did not start until late 2012 by two PlayStation enthusiasts where the first prototype was designed from scratch. It took many revisions and prototypes until the end product was developed. The project has taken many years to complete, and the cartridge you now hold in your hands is the end result.
Please check for updated versions of this manual at http://ps-io.com/downloads.
To report any problems, please see http://ps-io.com/problem.
For games that are currently having issues with PSIO, please see http://compatibility.ps-io.com/.
Warnings
- DO NOT get your cartridge wet.
- DO NOT leave your cartridge in or exposed to direct sunlight.
- DO NOT expose your cartridge to extreme temperatures.
- DO NOT store your cartridge where it is ‘open to the elements’ as dust will gather within the parallel connector, thus, not making a good connection with the PlayStation. To avoid this problem, package PSIO in the box it came with when it is not in use.
- We DO NOT recommend running your PSIO cartridge without the Switch Board installed. Failure to do so will not allow PSIO to boot as it may cause bus contention which may damage your PlayStation.
- We WILL NOT be held responsible for physical damage to your cartridge, nor are we responsible for the condition and or quality of your PlayStation’s Parallel Port.
- There are NO user serviceable parts contained within your PSIO cartridge. Unscrewing or opening your cartridge will render your warranty void. Should your PSIO cartridge require repair, please contact us directly and we will assist you.
Legal
‘PlayStation’, ‘DUAL SHOCK’, the “Triangle, Circle, Cross and Square” symbols and ‘PSone’ are registered trademarks (R) and are copyright (C) Sony Computer Entertainment Inc. All Rights Reserved. PSIO is in no way affiliated nor a licensed product by and of Sony Computer Entertainment Inc. Replication, duplication or reverse engineering of the PSIO hardware and or software is strictly prohibited, and may result in severe civil and criminal penalties. All source codes and hardware designs for PSIO are Copyright (C) 2010-2019 Cybdyn Systems. All Rights Reserved. By running our hardware on your PlayStation, you agree to our terms and conditions, and you agree that PSIO is a development tool and as such, it is solely intended for use as a developer’s tool. PSIO is in no way a modchip, modcard or device which bypasses or circumvents the internal security of the PlayStation system hardware or software in any shape or form whatsoever. The user of PSIO assumes full responsibility ensuring its use in accordance with local and federal laws. PSIO is in no way affiliated nor a licensed product by and of Sony Computer Entertainment Inc. The software and hardware on this site is provided “as-is”, without any express, implied warranty or guarantee.
Getting Started
Switch Board
Upon unboxing your PSIO cartridge, you will find an included ‘Switch Board’ kit.
This must be installed by soldering it to your PlayStation’s mainboard prior to plugging in PSIO to the ‘Parallel I/O’ port on the back of the PlayStation console. If this is not completed, PSIO will simply fail to work.
What the Switch Board does is it serves two functions. Firstly, it re-routes two important signals from the CXD-1815Q microcontroller (MCU) to the Parallel Port, and secondly, it allows ‘switching’ of the said MCU signals which allows your PlayStation to boot as normal should your PSIO Cartridge be unplugged from your PlayStation.
As mentioned, failure to install the Switch Board will not allow PSIO to boot and can cause bus contention which may damage your PlayStation. To continue reading about the Switch Board setup process, please follow through to the section labelled [4: Switch Board].
For more help and information regarding the Switch Board, please see http://ps-io.com/switch_board.
SD Card and Menu System
Once the Switch Board has been installed, grab an SD Card that ranges from 4GB to 32GB (SDHC) or 32GB to 512 GB+ (SDXC), and plug it into your computer.
Using the table below, format the appropriate filesystem to the SD Card:
- 4GB to 32GB as FAT32 (use the default allocation sector/cluster size).
- 32GB to 512GB+ as exFAT (it is advisable to use 256 KB for the allocation sector/cluster size).
As you can see, only two filesystems are supported which are FAT32 or exFAT. Partitions such as GPT (which are popular on systems such as Linux) aren’t supported.
Note that whilst the Menu System is running, changing SD Cards from FAT32 to exFAT (or vice versa) is okay as PSIO will re-initialise the correct filesystem as required. The Menu System file (MENU.SYS) must however be the same version running that was loaded on the PlayStation and the file must be present on the SD Card at all times.
Once you have done that, head over to http://ps-io.com/downloads and download the ‘Menu System’ Firmware. Please login if required using the account you created when you purchased your PSIO Cartridge. Then, extract and copy “MENU.SYS” to the root of your SD Card.
Next, you may begin copying your software images. PSIO only supports the *.IMG, *.ISO and *.BIN image formats. The extensions are not case sensitive. Your images must also be contained within folders (an example is shown below in section [2.4: Adding Games]). Anything else that is present in the SD Cards root directory will be ignored by the Menu System (excluding the wallpaper bitmap image file and update files).
Any directories and or filenames greater than a certain amount of characters (that is including the extension (EG: “.ISO”)) will be cut off within the Menu System by an ellipsis (three periods (“…”)) to avoid extrusion of the characters on screen. To scroll and see the game foldername, hold the RIGHT directional button down whilst in the primary game list.
Note that games will fail to mount if they exceed 60 characters, so be sure you do not exceed this amount.
The maximum amount of folders that PSIO will allow in the SD Card root directory is 1,000 and is file system independent (IE: FAT32 or exFAT do not have a separate limit and they are both set to 1,000).
They may also fail to mount/open however if they contain two periods (full-stops) in the filename. EG: “Crash.Bandicoot.BIN” will fail since the Menu System thinks that the file to load will be “Crash.Ban”. This is because the three (3) letters after the first detected period are classified as the file extension.
We only guarantee that a copy (backup) from your original black PlayStation CD-ROM will work correctly on PSIO. We do not condone booting illegal copies or downloaded games from the Internet (which are also known as ‘pirated games’ or ‘warez’).
CDDA Audio
If your PlayStation title supports and requires CDDA playback, a separate file (which we call a ‘CU2’ sheet) will be required in the games folder alongside your image file.
When using a CU2 sheet, the filenames must also match each other:
IE: “Destruction Derby.BIN” and “Destruction Derby.CU2”.
EG:
- SD:\Destruction Derby\DDERBY.BIN;
- SD:\Destruction Derby\DDERBY.CU2;
Note that white spaces are allowed in both the folder names as well as the file names.
The CU2 file essentially contains a list of track times. PSIO will look at them and utilise them in accordance with your game image as need automatically. If you do not specify a CU2 sheet, your game should work perfectly fine, but some games such as ‘Rayman’ have been reported to fail if it is not present. If no CU2 sheet is defined, you will not hear any in game music.
Note, that only games that use CDDA audio need a CU2 sheet. For details on how to create a CU2 sheet and use it with PSIO, please see [5: CU2 Sheet Files].
Adding Games
Please keep in mind that whilst PSIO can boot downloaded PlayStation games, we do not recommend nor condone it. PSIO was developed to play your backed-up games, thus leaving your original copies secure and intact whilst avoiding troublesome CD-ROM issues which is a common problem with most if not all PlayStation consoles.
With that info aside, please remember that games must be copied into folders first. Note that folder-in-folder navigation is not possible. So, as an example, the italic marked game title below is a directory and will be displayed in the Menu Systems list accordingly.
EG: “SD:\Crash Bandicoot [PAL]\crash bandicoot.BIN”.
Powering on your PlayStation
Once you have the Menu System copied as well as some games on your SD Card, insert the SD Card into your PSIO Cartridge.
Ensure that the label side of the SD Card is facing away from you, then, press the card all the way down until you hear it ‘click’. The card should slide into its slot smoothly. If it does not, do not force it in. You may have the card the wrong way around or you are using an incompatible card.
Once you have done that, ensure your PlayStation has all the required connections, such as power and video. So long as your Switch Board soldering is okay and you’ve re-assembled your PlayStation correctly, you may now press the power (“I/O” or “POWER”) button on your console.
Your PlayStation will now begin its normal initial boot sequence, beginning with the BIOS, followed by the License Screen. Take notice that the original license information (EG: SCEI, SCEE or SCEA) beneath the PlayStation logo has been replaced with the words “PSIO”. If you see this string of letters, the Switch Board has been installed correctly and the system should proceed to continue booting.
The setup screen will first ask you to set the required video mode (Region Setup). Whilst PSIO is 100% accurate at automatically reading the correct video mode for you to use, some PlayStations can utilise any video mode if and only if they are using RGB. We won’t jump into the technicalities and the advantages/disadvantages of video modes at this stage, but, by pressing the ‘Cross’ button [Yes], the automatically detected video mode will be selected for you, whilst ‘Triangle’ [No] will do the opposite. Please note that if for whatever reason your console either locks up or doesn’t produce a video signal after selecting the video mode you wish to use, please reboot your console and select the opposite mode of what you previously had chosen, since the setups settings are not saved until you are asked to do so at the end of the setup procedure.
Note that if you’re using a DUAL SHOCK controller, you will notice that vibration happens when navigating. This feature may however later be disabled in the Menu Systems under the option ‘DUAL SHOCK Vibration’.
Next, PSIO will ask you to select a track (Select a Track). All this does is offer to play some legendary classic PlayStation DEMO music for the rest of the initial setup process. The tracks are mostly composed by Jason Page of Sony Computer Entertainment Europe, and only the true hard-core PlayStation fans will recognise all of these tracks. If you don’t want to listen to any music, you may stop the currently playing track and advance forward. Note however that when no track is selected, when the Menu System loads it will play the original theme by default. This can be turned off in the Menu System options.
Once this is done, a keyboard will fade in asking you to enter your name. All this feature does is use your name throughout the Menu System from time to time as a greeting. If you do not wish to enter your name however, simply leave it blank and press the ‘Start’ button to continue.
The next page is the screen position setup screen (Screen Adjustment). Simply use the directional buttons on your controller to position the example Menu System so it displays and fits as best as possible. Once you have settled on the desired position, press the ‘Cross’ button [Accept/Select] to continue to the next screen.
The final page is a disclaimer for PSIO (IE: The ‘Terms and Conditions’). We ask that you take your time and read this page as it contains useful information in regards to copyrights and legal advice regarding the use of your cartridge. Pressing ‘Triangle’ [Accept and Save Setup] will mean that you agree to the terms and conditions, and wish to save your settings.
You will now be presented with an introduction video. The video and setup screen will only be shown when your PSIO cartridge is brand new, but if you would like to skip it, you may press either the ‘Cross’ button or ‘Triangle’ button to skip it.
Starting a Game
After the video has ended, you should now be presented with the Menu System. All of the games that you copied earlier will appear in the menu list. Use the directions buttons (‘Up’ and ‘Down’ arrows) to scroll, and press the ‘Cross’ button [Select] to bring up a small window containing some information about your selected game image (alternatively, you may press the ‘Start’ button instead of ‘Cross’).
Once the game information window is open, pressing the ‘Circle’ [Details] button will display advanced information about the game image you just selected.
- PS-EXE: The PlayStation Executable that has been mounted and will be launched.
- STACK: The starting location of the PlayStation Executable stack.
- EVENT: The number of Events the PlayStation Executable will utilise.
- TCB: The amount of Task Control Blocks that the PlayStation Executable will use.
- FILESIZE: The total size of the mounted image in Kilobytes (‘USB Mode’ will show “N/A”)*.
- EXTDSP Mode: If a manually created XA/CDDA file exits, it will state the chosen setting.
- MULTIDISC.LST? Should you have a MULTIDISC file, this will output either “Yes” or “No”.
- REGION? The Region detected from your image. Some games may output “Unknown”.
- CU2 SHEET? If a CU2 sheet present, this will output “Yes”. Otherwise “No” if not found.
* ‘FILESIZE’ will only display if it is enabled from the ‘Options’.
* ‘EXTDSP Mode’ will change to “Midboot” or “LoadExec” based on the “Execution Method”.
Whether you are on the ‘Display’ or ‘Details’ screen, pressing ‘Cross’ [Play] (or again, alternatively, ‘Start’) will finally boot your game. By default, the ‘PlayStation Logo Popup’ splash will chime in and take effect before booting your game (this may be changed or disabled in the ‘Options’ if need be under the option ‘PlayStation Logo Popup’).
To select a new game, simply press the ‘RESET’ button on your PlayStation console. You may also turn off and on your PlayStation should you need to. The whole procedure will now repeat. If you get tired of waiting for the ‘BIOS’ and ‘License Screen’ to run their toll, when the Menu System has booted, press the ‘Triangle’ [Options] button, and toggle “Enable Fastboot” to “Yes” by pressing the ‘Cross’ [Toggle] button. This will skip both boot screens, thus reducing your boot up times and getting you into your games quicker (see [7.5: Fastboot] for more detailed information regarding Fastboot).
To boot your original PlayStation format ‘black’ CD-ROM games, open the PlayStation drive door, place your game disc into the PlayStation drive and close the drive door. As long as you’re not in ‘USB Mode’, you may then go ahead and press the ‘Circle’ [Load CD] button. Your game will now boot as if the PSIO cartridge were never installed. Note that your CD-ROM will only boot if the Switch Board has been installed. Also note that should booting from a CD-ROM fail, you must reset your PlayStation. Keep in mind that when a disc is in the CD-ROM drive, the disc will be kept in an idle state (IE: the disc will be ‘free spinning’ at 1x speed).
Unplugging PSIO
When it comes time to unplug your PSIO cartridge from your PlayStation, it is important that you do not twist and or unplug the cartridge on an angle. This will put stress on PSIO’s gold plated pins housed within the Parallel Port, the Parallel Port plastic and your PlayStation console.
Instead, firmly grasp the cartridge with a single hand on either side of the plastic case near the top, and pull the top of the cartridge towards you to generate a ‘pivot’ effect. The bottom side (Parallel Port) should ‘pop’ out equally on both sides, thus putting no stress on any of the pins or any angle on the cartridge.
The same principle applies to plugging in your cartridge. Ensure that when you are plugging in PSIO, both corners are straight (parallel), and in-line with the PlayStation before inserting the cartridge.
We are not responsible for any damaged caused to your cartridge by improper insertion or removal.
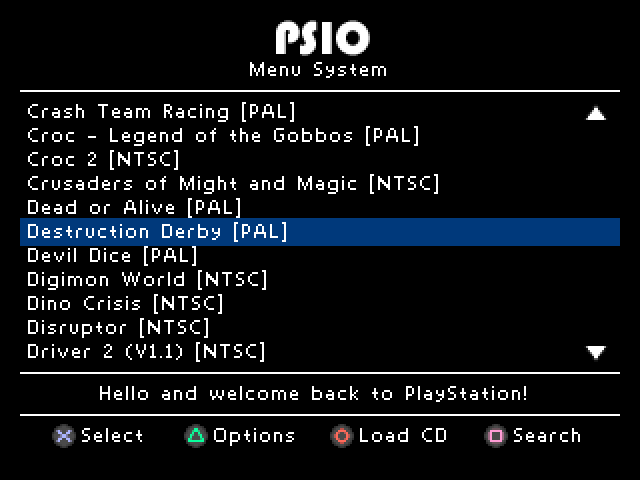
The PSIO Menu System
The Main Screen
At the top of screen is the PSIO logo.
The centre of the screen will display all folders found within the SD Cards root directory. We recommend naming each folder the same as the games title that the developers intended to keep the list clean and concise.
The list is hardcoded to display everything alphabetically. The Menu System will alphabetically sort all 64 characters of the directory string. If you have more than or equal to 256 folders in the root directory, this number drops considerably down to 16. As a result, some elements will may not be sorted correctly. This is done to ensure that the Menu System operates at a high speed. This option
cannot be changed. Note that if you do have more than 256 files on the SD Card, whilst booting, the Menu System will take longer to load, and hence, display the string “Please Wait” whilst it is loading up and processing data.
If you have more than 11 games in NTSC mode or 13 games for PAL mode, on the right side of the screen, arrows will be displayed to indicate where you are positioned within the games list. You may fast scroll though the list by pressing and holding ‘L2’ for up and ‘R2’ for down, or if you have a “DUAL SHOCK” controller, by using the left ‘Analog Stick’ (see section [3.6: Shortcuts] for more information).
Under the games list is a scroll box that contains copyright information.
Lastly, below the scroll box are the navigation buttons.
Take notice that the Menu System is for use under the English language only, and no other languages are supported. This includes both file names and directory names as well. Using another language may result in strange behaviour of the Menu System.
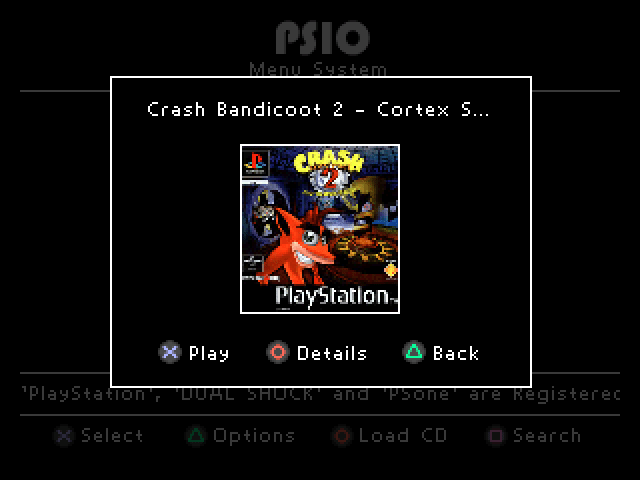
The Select Screen
The games selection window contains your game title (from the folders name), followed by a cover art image in the centre.
Pressing ‘Circle’ [Details] will display information about your game (see [2.6: Starting a Game] for more information on these elements). Pressing ‘Circle’ [Display] again will change back to the cover art.
Note that if you have a MULTIDISC.LST file, pressing ‘Circle’ [Display] yet again will show more information. Once you are in the ‘M-Disc’ dialog window, it is possible to scroll in a mini-list should more than one game be listed in your MULTIDISC.LST file. Using this method, you can select which disc you would prefer to load first which is exceptionally useful.
Pressing ‘Cross’ will boot your selected game, and pressing ‘Triangle’ will return you back to the primary games list.
The Options Menu
Video Mode:
This will change the Menu System into either PAL or NTSC for your TV. PAL will run at 50Hz whilst NTSC will run at 60Hz, thus the NTSC menu runs ‘smoother’. NTSC is also running at a screen height of 240 pixels, whist PAL is capable of rendering at 256 pixels, thus, the PAL menu can fit more games on the screen. As a note, the Menu System is hardcoded to run at 25 frames/sec for PAL and 30 frames/sec for NTSC.
Sound Effects:
Enable or disable Sound Effects within the menu.
PlayStation Logo Popup:
When you launch a game, you have the option to display a popup icon or animation. The available options for this setting are:
- ’94 Splash (PlayStation 1994 TV Commercial Splash Sound),
- Japanese (The word “PlayStation” pronounced in Japanese),
- Off (Disable the popup logo entirely).
Background Music:
There are 7 selections to choose from, which are:
- Off (disable the background music within the menu from playing entirely),
- Original Menu (the original classic Menu System theme),
- DEMO 1 (V1) (iconic DEMO 1 theme from Version 1+ discs),
- DEMO 1 (V3) (iconic DEMO 1 theme from Version 3+ discs),
- Underwater (DEMO 1 Version 6+ (written by Jason Page)),
- UK DEMO #18 (Official PlayStation Magazine UK Demo Disc #18),
- UK DEMO #58 (Official PlayStation Magazine UK Demo Disc #58), and
- UK DEMO #22 (Official PlayStation Magazine UK Demo Disc #22).
Burn-in Timer:
CRT (Cathode Ray Tube) televisions (TV) and Plasma televisions have a tendency to ‘paint’ themselves with a permanent picture should that picture be displayed for more than several minutes (this is called ‘Burn-in’). If a static picture is left idle for several hours, the burn-in is much more catastrophic.
What the burn-in timer (screen saver) does is when you are away from the PlayStation for 15 seconds, it will automatically blank the screen to an RGB value of 0, 0, 0 (black), and move a PlayStation logo around the screen randomly. This technique will avoid the Menu System from being burnt into your display.
It is highly recommended that CRT or Plasma TV owners turn on this setting to prevent picture tube burn-in to prolong the life of their display(s), but it is only beneficial if the ‘Menu System’ will be left on idle for more than several minutes (EG: Leaving PSIO running at a kiosk).
Selection Bar Colour:
Changes the selection bar colour from the standard Blue, Red, Green, Yellow, Grey or White.
Japanese Navigation:
Asia specific PlayStations tend to have the ‘Circle’ button as ‘Accept or Okay’, and the ‘Cross’ button as ‘Decline or Back’. This option will invert the system so that ‘Circle’ and ‘Cross’ are effectively swapped.
Show Filesizes:
Enabling this option will effectively show the total filesize of the selected image on the ‘Details’ screen in Kilobytes. Note that when PSIO is in ‘USB Mode’, this will always show 4.
EXTDSP Mode:
This will allow you to toggle between three (3) levels of our intelligent R3000A CPU register ‘hook’ that enables eXtended Architecture (XA) audio or Compact Disc Digital Audio (CDDA) to function correctly. The default option is “K1V3”. There is also an option to completely disable this function, and you may try turning this off if you find your game freezes or crashes, however all CDDA and XA audio will be disabled. Please be sure to contact us if you find this is the case
so we may address the problem and release a new firmware upgrade.
If you would like to set a game selection to forcefully use an option automatically, please read section [3.10: Manually Defining the EXTDSP Mode].
Advanced Information:
- K1V1 is the first version of our hook. It stores the register space and CD volume registers very low in the PlayStation Kernel. Some games require this setting in order to run correctly. This setting is mostly used with ‘Psygnosis’ titles.
- K1V2 is the same as K1V1, but restores the K1 register after updating the K1 register value. Not too many games will work with this option, but it is included nonetheless.
- K1V3 is directly based off of K1V1 but stores the register space and ‘CD Volume Registers’ much higher in the PlayStation Kernel. Most if not all games work with this option.
- K1V4 was completely written from scratch. It only updates the registers at the same rate as the display update rate thus giving the highest compatibility. It is the default and recommended option to use.
MC68HC705 License:
This option allows the license string contained within the HC05 (CD-ROM command handler microcontroller) to be forcefully changed when launching a game. This string may be more recognisable by you as the four letters which appear underneath the PlayStation logo during the BIOS bootup stage (also known as the license screen). The reason for adding this option is because some software titles (such as “Dino Crisis”) check this license string, so the option to
either make it “SCEA”, “SCEE”, “SCEI” or “AUTO” has been added.
Advanced Information:
- SCEA will set it to an American “Sony Computer Entertainment America” license string.
- SCEE will set it to a European “Sony Computer Entertainment Europe” license string.
- SCEI will set it to a Japanese “Sony Computer Entertainment Inc.” license string.
- AUTO will set the license string automatically to either “SCEA”, “SCEE” or “SCEI” directly based off of the data pulled from the selected software image (this can be seen on the ‘Details’ page when the game information window is open under the text section labelled “REGION?”).
Enable Fastboot:
This option enables or disables Fastboot. This program code is built into your PSIO Cartridge and no external files are required to use this feature. Fastboot will essentially skip the PlayStation BIOS boot procedure, thus getting you into the Menu System and your games quicker. Note that the Fastboot toggle option is disabled whilst in USB Mode.
Execution Mode:
Selects whether to use “LoadExec” or “Midboot” for executing PS-EXE’s. When ‘Midboot’ mode is active, the “EXTDSP Mode” option is disabled since ‘Midboot’ operates by rebooting the PlayStation, skipping the startup procedure and using the BIOS to execute the game directly. ‘LoadExec’ however loads the PS-EXE into RAM and jumps to it whilst preserving some elements in memory (as well as some registers) which can cause problems for some games. ‘Midboot’ uses the ‘K1V4 EXTDSP’ mode internally and is recommend to use for maximum compatibility.
DUAL SHOCK Vibration:
If a DUAL SHOCK controller is present, this option will be able to be changed to either “On”, “Popup Only” or “Off”.
The setting “On” will enable vibration on all menu selections and dialog windows, whilst the setting “Popup Only” will only cause the DUAL SHOCK controller to vibrate when the “PlayStation Logo Popup” occurs during a game selection and execution stage. Note that both the ’94 Splash’ and ‘Japanese’ popups have different vibration patterns.
Also note that if no DUAL SHOCK controller is detected, this option will not be able to be changed and the resulting option will contain “N/A”.
Enable Wallpaper:
This option allows you to show or hide the ‘WALLPAPER.BMP’ file present in the root of your SD Card. If the file is not detected, an error is present regarding the file or you’re in USB Mode, this option will be disabled. For more information on setting up the wallpaper, please see section [3.8: Wallpaper].
Change Username:
Selecting this option will bring up an on-screen keyboard which will allow you to change a username. Usernames have a maximum input length of 20 characters. If you’d like to remove or clear a username, simply leave the text input section blank and press the ‘Start’ button.
System Diagnostics:
Will show some basic information about your PlayStation such as the amount of memory free and the current load of the CPU and GPU, but this is still in development so the CD-ROM and SD Card Read Performance details do not work at the moment.
System Information:
This will display the Menu System version, the total amount of games (folders) found, the ‘ARM Firmware’ version, the ‘FPGA Firmware’ version, your PlayStation BIOS ROM version (including the CRC32), what file system is detected on your SD Card (USB mode will show “USB” however) and your cartridge Serial Number.
Pressing the ‘Circle’ [Credits] button show further information about your cartridge, including the System Loader version, the Fastboot version, the Username and SD Card File System.
Legal Information:
Displays copyright notices to prevent Sony from attacking us with their “Move Controllers”. Pressing the ‘Circle’ [Next] button will trigger a sound bite, and display further copyright information on the behalf of Sony Computer Entertainment Inc.
Play the Intro Video:
Self-explanatory.
Show the Credits:
Explanation is redundant.
Adjust the Screen:
Changes the position of the drawing vectors that the PlayStation uses for its coordinates. PAL mode will display a 320×256 image for adjustment, while NTSC mode will display a 320×240 image for adjustment.
Install the PlayStation Debugger:
This will allow you to install our debugger for use with the ‘Systems Console’. It will only function once a game has been booted. Debugging the Menu System is prohibited.
Go to the PlayStation BIOS:
Reboots the PlayStation and goes to the BIOS (useful for accessing the Memory Card manager).
Reset Options Defaults:
Resets everything back to their factory default settings.
Alternatively, you may hold the ‘START’ + ‘SELECT’ buttons during the Menu Systems boot process (the screen where the white loading bar and PSIO logo are displayed) to force a hard reset.
Saving Changes:
Whilst still in the [PSIO System Software Options] menu, pressing the ‘Circle’ [Save] button will bring up a secondary window asking if you would like to save your chosen settings to PSIO’s Flash ROM. Pressing ‘Cross’ [Yes] will save your chosen settings, in which they will then be loaded on boot automatically.
Load from the CD-ROM Drive
To load an original disc based PlayStation game, first insert your PlayStation formatted game into the disc drive. Once you have done that, boot up the Menu System and press ‘Circle’ [Load CD] to bring up the “Load from the CD-ROM Drive” window. You may now press ‘Cross’ [Yes] to boot your game. Due to the nature of how PSIO functions, if loading from the CD-ROM fails, you must reset your PlayStation 1 manually.

Reboot the PlayStation
Should you wish to restart your PlayStation 1 from within the Menu System, there is an option to do so. Simply go to the ‘Options Menu’ by pressing ‘Triangle’ [Options] and scrolling down to the option “Restart the PlayStation”.
Shortcuts
Within the Menu System, shortcuts have been implemented to help speed up navigation. You may use the ‘L2’ and ‘R2’ buttons within the primary games list to fast scroll. Fast scrolling may also be used within the “PSIO System Software Options” screen. For an instant fast scroll with no delay, DUAL SHOCK controller users may use the left ‘Analog Stick’, or click either the ‘L3’ and ‘R3’ buttons to jump to the top of the games list, or the bottom of the games list.
As mentioned in the [3.3: The Options Menu] section, to reset the Menu System and restore the default settings, you may hold the ‘START’ + ‘SELECT’ buttons during the Menu Systems boot process (the screen where the white loading bar and PSIO logo are displayed). Note that this will also enable the first time boot video to be played again.
Cover Art
To add custom covers, you must have a bitmap (.BMP) image that is 80 pixels wide by 84 pixels high (80×84) for use on the PlayStation. You may not use any other size, be it larger, or smaller. Once you have a bitmap in those dimensions, simply place a bitmap image (cover art) in your games folder.
You may use any name for the cover art as the Menu System will automatically look for the filename extension, “.BMP” (uppercase or lowercase is fine as the extension is not case sensitive). However, you must not exceed the maximum character length of 60 chars, otherwise, it will fail to detect the bitmap file.
Wallpaper
The Menu System allows the use of custom background images or wallpapers. To enable this feature, simply create a Bitmap (BMP) file which is exactly 320×256 pixels in size and place the file in the root directory of your SD Card as the filename ‘WALLPAPER.BMP’.
Note that the file size must not exceed 250,814 Kilobytes (KB).
Lightgun Support
When a Lightgun is plugged into the PlayStation and the Menu System is running, the background will become grey, even if a wallpaper was enabled. This is done because a brighter raster is required to help assist with the Lightgun vector position scanning so that the crosshair does not jitter and registers correctly on-screen. Please note that KONAMI Justifier Lightguns do not work as well with the Menu System versus the NAMCO G-Con45 Lightguns as they operate completely differently.
There are only three supported buttons when the Menu System is in Lightgun mode. They are the ‘Trigger’, ‘A’ and ‘B’.
To navigate the menu, aim the crosshair in either 50% of the screen and pull the ‘Trigger’ button. IE: aiming the crosshair in the top 50% of the screen will cause the menu to scroll upwards, whilst aiming to crosshair in the bottom 50% of the screen will cause the menu to scroll downwards whenever the ‘Trigger’ button is pressed.
Tapping the ‘Trigger’ button will cause a stepped scroll, whilst holding ‘Trigger’ will cause the menu to scroll much faster. The ‘A’ button will then select your game, whilst the ‘B’ button will return you back from the selected game should you wish to select something else.
Manually Defining the EXTDSP Mode
Based on the information in section [3.3: The Options Menu], option 9 (EXTDSP Mode), it is possible to toggle between our different intelligent R3000A CPU register hooks that enables the ‘eXtended Architecture’ (XA) audio or Compact Disc Digital Audio (CDDA) to function correctly. However, it can be very tedious and frustrating to manually change this option every time you wish to play a different game.
To overcome this issue, we have added into the Menu System logic the option to manually define this settings value. To do so, simply create a file named either “K1V1”, “K1V2”, “K1V3” or “K1V4” and place it in your images directory (along with the Bitmap image (.BMP) and “MULTIDISC.LST” file if they exist).
The file must not have an extension associated with it (EG: “K1V1.TXT”), or the Menu System will fail to detect it (IE: It must only be called “K1V1”). Do not place more than one (1) manually defined file in your images directory.
Note: Toggling the setting ‘EXTDSP Mode’ in the ‘Options’ to “Off” will override any of the three (3) defined files. You will also know when you’re using a forced/overridden EXTDSP mode when an asterisks () appears next to the “EXTDSP MODE:” text whilst you are on the ‘Details’ screen of the current game selection.
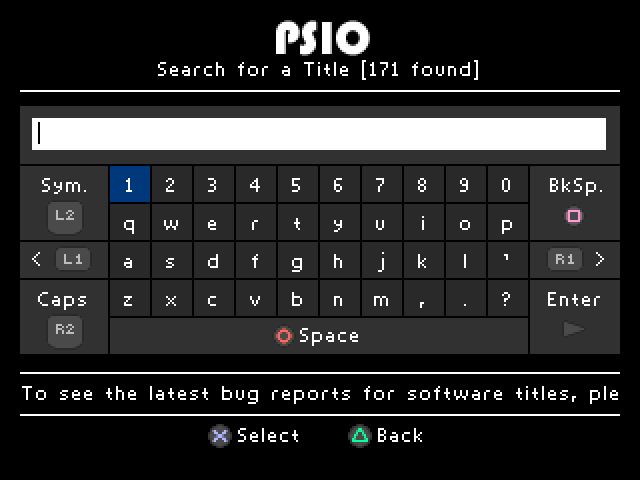
Using the Search Option
The Menu System has a very unique feature which enables the use of searching for titles present on your SD Card. To use this feature, simply press the ‘Square’ [Search] button and begin typing a known game that is present on your SD Card. This feature is very useful as it not only makes finding your game easier, but much quicker too.
Searches use the well-known ‘strstr’ C function. The search is case insensitive, and it simply searches for the first location of the text you have entered within the games list. There are no wild-cards in this search routine.
Speeding Up
You may notice that the Menu System takes several seconds to load when powering on your PlayStation. This is because the system performs multiple checks which takes time for the CPU in the PlayStation to calculate.
However, some other routines can be disabled to assist in speeding load times, such as:
- Disabling the wallpaper,
- Disabling the background music,
- Keeping the amount of games on the SD card to a maximum of 200, and
- Not using bitmap cover art files for games.
Switch Board
Overview
Sony never provided direct access to the CD-ROM CPU on the Parallel I/O bus. In our case, access to the chip select and interrupt lines. What the Switch Board does is it actually switches the required address lines and forwards them through to the PSIO cartridge. The Switch Board also allows PSIO to control the CD-ROM directly and give us complete control over it which is why booting original discs still works.
Installation
We will not cover installation of the Switch Board in this document. Setup and installation information can be found in separate files located at http://ps-io.com/switch_board.
CU2 Sheet Files
Creating a CU2 Sheet
There are two ways to create a CU2 sheet for use with CDDA. The recommended way is to use automated compilation which will compile a CU2 sheet directly based off of your image data. The second way is manual compilation which is slower and might produce errors in the CU2 data because of different file structure integrities.
As a note, both options involve using our ‘Systems Console’ program which runs under Windows.
Note that PSIO will always look for a BIN, IMG or ISO file and use the filename to associate itself with the CU2 sheet. CU2 sheets are not mounted but are rather referenced by the image file itself.
Automated Compilation:
In order to create a CU2 sheet automatically, you must first have your image ready to be processed by the ‘Systems Console’. Most typical game images will consist of a ‘Single-BIN’ array which typically looks like this:

If you have a ‘Multi-BIN’ array that consists of multiple tracks where you need to convert them for use with PSIO and to also generate a CU2 sheet from them, please skip this section and jump ahead to section [5.2].
To generate a CU2 sheet from your ‘Single-BIN’ image for use with PSIO, simply run the ‘Systems Console’, and click on ‘File’ -> ‘Convert CUE/CU3 to CU2…’. Once this is completed, you will have your original single image with a CU2 sheet for use with PSIO.
Lastly, copy your game images to your SD Card (taking into note that the BIN and CU2 must be contained within a directory on the SD Cards root directory).
Your game will now have CDDA audio.
Manual Compilation:
In order to create a CU2 sheet manually, you must first create an empty file with the “CU3” extension. For an example on how to do that, simply create a ‘New Text Document’ and rename the extension from “.TXT” to “.CU3”. Be sure you call the CU3 file the exact same name as your game image name as mentioned in [2.3: CDDA Audio] since it will be converted using the same name from a CU3 to a CU2 later on.
Next, head over to http://REDUMP.org/ and find your game title in the games list. For example, if your game is “Destruction Derby’, you would press ‘D’ where the “Starts with” section is, and scroll down until you see Destruction Derby. However, please take care in picking your game as you have Europe (PAL), American (NTSC-U/C) and Japanese (NTSC-J) titles available. In this example, we will assume my title is PAL, so I will click the blue European flag.
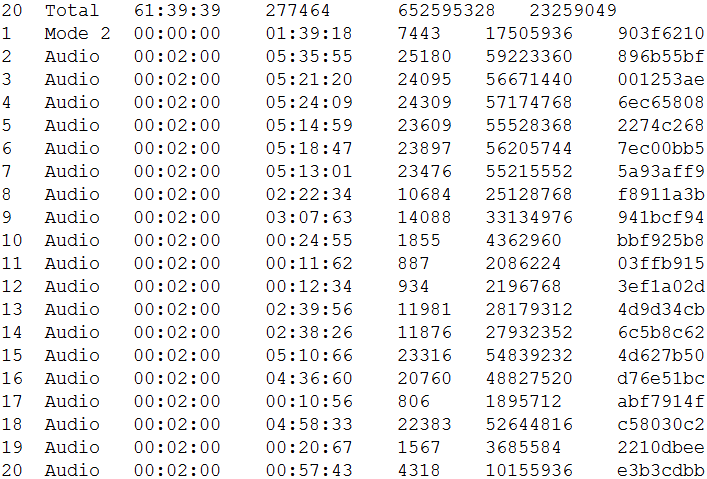
Once you have found your game and have clicked on its link, you must highlight and select the track dump listing. In the image below, you can see I’ve done that as per marked in the red outline:

Once you have highlighted it, copy it to your clip board (CTRL+C) and paste it to your newly created file, “Destruction Derby.CU3”.
Next, remove the lines “Data/” from track 1, leaving just the words “Mode 2”.
Following that, move the last line labelled “Total” and place that above track 1.
Finally, add in front of the word “Total” the last track number. In our case, it’s track 20.
Here is an example of how your text file layout should look
Don’t forget to save your changes!
Your CU3 sheet is now ready for conversion into a CU2 sheet using our “System Console” program which may be downloaded from http://ps-io.com/downloads.
Once you have ran the ‘Systems Console’ program, convert your CU3 into a CU2 by going to ‘File’ -> ‘Convert CUE/CU3 to CU2…’. This will generate the final needed CU2 sheet. So long as your CU3 data was correct, copy your newly outputted CU2 file (Destruction Derby.CU2) to your Destruction Derby folder on your SD Card and boot your PSIO cartridge into the Menu System. As mentioned in section [2.3: CDDA Audio], the CU2 sheet name must match your image name or else the Menu System will fail to detect it.
Once the Menu System has booted, if you select the Destruction Derby folder, you should now see in the ‘Details’ screen, “CU2: Yes”.
Multi-BIN
PSIO doesn’t support Multi-BIN images. However, Multi-BIN images may be converted into a single image which PSIO will accept and use. In order to merge and convert a Multi-BIN image into a single image, the ‘Systems Console’ program must be used.
To convert your images into a single image for use with PSIO which will also generate a CU2 sheet, simply run the ‘Systems Console’ and click on ‘File’ -> ‘Batch Image Conversion…’.
Next, click on the directory you would like to convert followed by ‘OK’. The ‘Systems Console’ will now start processing the data automatically. Depending on how many tracks there are, how large they are and your computers processing power, the process may take anywhere from 5 seconds to 1 minute. Once this is completed however, you will have a single image with a CU2 sheet for use with PSIO. Lastly, copy this to your SD Card (taking into note that the image and BIN must be contained within folders on the SD Cards root directory) and your game will now have CDDA audio.
PSIO Systems Console
Overview
The PSIO Systems Console is a Window application that enables useful tooling for PSIO, such as the ability to run software images from USB directly instead of the SD Card.
If you have any problems regarding starting the software or if you cannot load images via USB, please see here for more information: http://ps-io.com/syscon
Uses
The primary usage for the Systems Console is to:
- Enable USB software booting,
- Automatically convert Multi-BIN images to Single-BIN images,
- Convert Multi-Disc titles into the correct format whilst auto-generating the MULTIDISC.LST file,
- Automatically generate CU2 data,
- PlayStation Debugging,
- Convert CUE/CU3 to CU2 data, and
- Test miscellaneous CDDA options.
Specifications and Usage
Advanced Information
Your PSIO cartridge contains a custom printed circuit board with delicate electronics inside. Do not get your cartridge wet, do not leave it in direct sunlight and do not store the cartridge open to the elements as dust will gather within the parallel connector. Thus, this will then not allow PSIO to establish a good connection with your PlayStation console. We recommend leaving an SD Card in PSIO to prevent dust from accumulating in the SD slot, or to put PSIO back in its original box to protect it. We will not be held responsible for physical damage to your cartridge, nor are we responsible for the condition and/or quality of your PlayStation’s Parallel Port.
If your PlayStation has a Modchip installed, PSIO will work fine alongside with it, even with the Switch Board installed.
There is a yellow LED on your PSIO cartridge. This LED will blink heavily whenever the cartridge is busy handling commands. It is not recommended to remove an SD Card whilst the LED is active.
There are no user serviceable parts contained within your PSIO cartridge. Unscrewing or opening your cartridge will render your warranty void. Should your PSIO cartridge require repair, please contact us directly and we will assist you.
PSIO uses 7.5V directly from the PlayStation console which is regulated to three other voltages afterwards. It draws a maximum of 174mA at its peak, an average of 168mA, and a standby rating of 156mA.
The plastic case of PSIO is made from ABS plastic which we designed from scratch and was made for us. The Parallel Port contains brass pins which were gold-plated and were also custom created by us.
After long periods of use, your PSIO cartridge will get very warm. This is due to the fact that there is a high-speed ARM processor and FPGA inside your PSIO cartridge which are both passively cooled. This means that the heat is contained within your cartridge. This is normal. There are no air vents in your PSIO cartridge as they are simply not needed. The SD Card frame also acts as a heatsink, so do not be alarmed if your SD Card becomes quite warm too. Whilst testing at an ambient temperature of approximately 28 degrees Celsius, the average temperature PSIO will reach internally is approximately 55 degrees Celsius. It is not recommend to use your PSIO Cartridge in a very hot room (EG: 40 degrees
Celsius) since this will raise the internal temperature considerably which may cause damage to your SD Card and or PSIO Cartridge.
PlayStation BIOS
To boot to the standard PlayStation BIOS Menu Screen to access the “Memory Card” and “CD-ROM Player” functions, you can either select from the Menu System options list, “Go to the PlayStation BIOS” or you can physically unplug your PSIO Cartridge and boot up your PlayStation.
Please note that if you boot PSIO without an SD Card, your PlayStation will boot to the ‘System Loader’ which is also another method of gaining access to the BIOS. If you see this screen by error however and the SD Card is inserted, please go back to section [2.2: SD Card and Menu System].
PAL vs. NTSC
PAL (Phase Alternating Line) games will run on an NTSC console with PSIO, and NTSC (National Television Standard Committee) games will run on a PAL console with PSIO. However, if you are not using RGB directly, a colour modification is required to your PlayStation mainboard. Depending on your PlayStation model, a pin from the GPU must lifted and its solder pad must either be pulled low (grounded), or pulled high (connected to voltage) to force a PAL60 or NTSC60 picture.
Also note that some PlayStation games use the R3000A (CPU) free running timer as a sync method for audio timing. As an example, playing the NTSC version of “Bust A Groove” on a PAL PlayStation (and vice versa) will cause sync issues.
SCPH-9000/PSone
Your PSIO cartridge was specifically designed for use only with a PlayStation console that contains a Parallel Port (‘Parallel I/O’). As for the PlayStation consoles that do not have this port, no support is offered at the moment.
Fastboot
PSIO has the potential to skip the PlayStation BIOS boot sequence, thus getting you into the Menu System much faster. To enable Fastboot, simply go to the ‘Options’ window by pressing ‘Triangle’ [Options] and then changing the option “Enable Fastboot” to ‘Yes’. Do not forget to save changes by pressing ‘Circle’ [Save] from the ‘Menu System Option’ window or else the PlayStation will not detect that Fastboot is enabled the next time you power on your console.
Multi-Disc
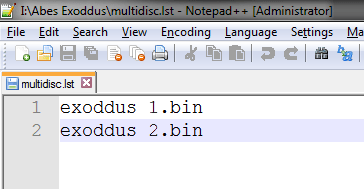
PSIO has the option to support Multi-Disc titles. To enable and use Multi-Disc images, you must create a file in your game directory called “MULTIDISC.LST” (not case sensitive).
IE: “exoddus 1.BIN”, “exoddus 2.BIN” and “MULTIDISC.LST”.
EG:
- SD:\Oddworld – Abes Exoddus\exoddus 1.BIN;
- SD:\Oddworld – Abes Exoddus\exoddus 2.BIN;
- SD:\Oddworld – Abes Exoddus\MULTIDISC.LST;
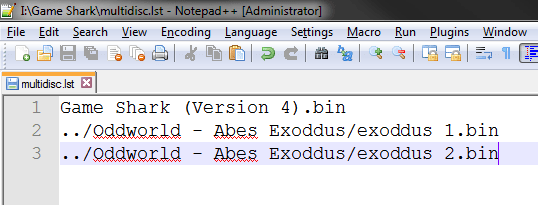
The “MULTIDISC.LST” file must then contain your game images. Each image is defined on a new line. The first defined image is the image that PSIO will boot first. As a note, ensure that there is no ‘return’ on the last line (IE: take notice that there is no line 3 as seen in the image below).
For some advanced redirecting, you may use ‘..’ to return to the root path, where you may then pre-define other directory listings from the root of the SD Card to act as Multi-Disc games. In the example below, you can see we have loaded a “Game Shark” image. When a disc change event happens, PSIO will swap and use “exoddus 1.BIN”. Whilst this feature isn’t very practical for consumers, it’s great for developers that may need to jump between different versions or builds of their game to load in different data elements.
To actually swap a disc, simply eject the SD Card, wait a second or two, and then re-insert the SD Card. So long as your “MULTIDISC.LST” file is correct, your disc will swap will happen seamlessly.
As a sanity check, if the Menu System detects a “MULTIDISC.LST” file, you will have a third option [M-Disc] to cycle through to display the contents of the “MULTIDISC.LST” file.
As a note, when using the ‘Systems Console’ with ‘Multi-BIN’ images which are Multi-Disc based, the software will generate the required MULTIDISC.LST file automatically when doing a Batch Conversion (see section [5.1: Creating a CU2 Sheet]).
If for some reason the file refuses to be detected in the Menu System and/or is causing the system to freeze, ensure that a “CR + LF” (line feed + carriage return) exists at the end of the ‘MULTIDISC.LST’ file. This is an advanced technicality, so the details of how to do it will not be explained here. However, to avoid such a problem, the file should be created and saved in the ‘ANSI’ format and not ‘UNICODE’.
When editing a MULTIDISC.LST file, we recommend using the program ‘Notepad++’ for Windows.
The Menu System also gives you the option to select what disc you would like to boot as there is a mini-menu within the ‘M-Disc’ dialog window. Simply highlight the disc you would like to boot and press the ‘Cross’ [Play] button.
Updating and USB
Firmware
Your PSIO cartridge has two firmwares and a Menu System, all of which are updatable without any additional cables or dongles. One is for the FPGA called “UPDATE.FPG”, and the second is for the ARM called “FIRMWARE.AFW”. However, as of ARM V2.5.4, the ARM Firmware and FPGA Firmware files are no longer required since they are programmed internally.
So, with that in mind, if you have a PSIO Cartridge with an ARM Firmware less than or equal to V2.5.4, jump to section A. Otherwise, please jump to section B.
Section A)
As of Menu System V2.6.4, the ARM firmware is updated internally and the file “FIRMWARE.AFW” for the ARM is no longer required. However, because the logic for internal updating is not present on the older ARM firmware (prior or equal to V2.5.4), you will need to update it to V2.5.5 manually in order to gain the internal updating functionality from the Menu System.
Section B)
Since the ARM and FPGA Firmwares are now updated internally by the Menu System, you do not need to update manually. If there are any updates, they will be applied to your PSIO Cartridge automatically.
DO NOT use firmware files downloaded from an unknown source.
DO NOT use non-genuine firmware(s) on your PSIO Cartridge.
All firmware(s) for PSIO may be found on our website at http://ps-io.com/downloads.
To update, place any or all two of firmware files stated above in your SD Cards root directory by copying them from your computer.
Next, make sure your PlayStation is turned off, insert the SD Card in PSIO and power on your PlayStation. Note that the PlayStation must be powered off and then powered back on to run the update procedure (pressing the ‘Reset’ button will not trigger the update procedure).
However, if you are updating via the Menu Systems new method there is no need to power off your PlayStation (this is now done automatically for you).
DO NOT power off your PlayStation once you have turned it on.
Even when the console is displaying a blank screen, it is currently flashing the built in ROM that the PSIO Cartridge contains. This process generally takes a maximum of 5 seconds. Turning off your PlayStation within this timeframe whilst updating will brick your PSIO cartridge and you will have to try attempting the “RECOVERY.BIN” method explained below. Repair assistance may also be required which we will offer by ‘Service Desk’ support. If for some reason the ‘Menu System’ will no longer boot, you can try holding down the ‘START’ + ‘SELECT’ buttons when powering on your console to force a full factory reset.
Once you have turned on your PlayStation, wait until the Menu System boots up. If there is a new update contained in the Menu System, it will update your PSIO Cartridge for you and reboot your PlayStation automatically.
If you followed ‘Section A’ above, once the Menu System boots up, if you have any of the firmware files still present on the SD Card, the Menu System will not function until you delete these files. So, remove the SD Card from your PSIO Cartridge and insert the SD Card into your computer and delete the ARM and FPGA update files (“FIRMWARE.AFW” and/or “UPDATE.FPG”) which you just copied whilst leaving the “MENU.SYS” file present on your SD Card. If you do not do this, the Menu System will remind you to do so.
Your PSIO cartridge is now updated. You may confirm the update was successful by pressing ‘Triangle’ [Options], and scrolling down in the “PSIO Menu System Options” list to “System Information” and pressing ‘Cross’ [Select]. Here you will see useful information about your cartridge. Take notice and ensure that the “Menu System” version, “ARM Firmware” version and “FPGA Firmware” all match the same as the file details downloaded from our website. This verifies you have successfully updated your PSIO Cartridges firmware.
If you have problems updating or your PSIO Cartridge has somehow become bricked (you powered off your PlayStation whilst updating, or something else happened such as it hangs at the BIOS or the LED does not blink anymore when it should be reading from the SD Card to boot), there is a final step you can attempt to take in order to restore the ARM Firmware which may have become corrupted. In order to do this, you need to rename the ARM Firmware file from “FIRMWARE.AFW” to “RECOVERY.BIN” and put that on an SD Card formatted as FAT32 in the root directory. Once done, insert the SD Card in your PSIO Cartridge and power on your PlayStation. If you are attempting to recover by “RECOVERY.BIN”, remember that it is critical that the SD Card is formatted as FAT32 and not exFAT, otherwise it will not attempt to recover the firmware.
If you still have problems, please contact us directly using the website contact link so we may assist you further as there may be a more advanced problem with your PSIO Cartridge.
USB
To use the USB (Universal Serial Bus) communication link function that PSIO offers, simply plug PSIO into any computer running the Windows 7 (or greater) Operating System.
To load an image via USB, first be sure that your PlayStation 1 is off. You may then attach a USB Type-B mini cable to your cartridge and turn the PlayStation on. USB mode will then be initialised. On your computer, you will see a notification saying that a “PSIO (Cybdyn Systems) USB Device” is being installed. During this period, the driver is automatically being installed for you using the generic “DISK.SYS”, “PARTMGR.SYS” and “PSSNAP.SYS” drivers which come with Windows.
Please note, that your PlayStation will show a black screen whilst a USB connection is present, and your reset button will no longer function. This is normal. In order to know whether you’re in USB mode or not, PSIO will blink its activity LED 3 times rapidly, and on the third blink, the LED will stay on. When the LED turns completely off, a connection between PSIO and your computer has been established, and as such, PSIO is in USB standby mode waiting to receive data from your PC.
Whilst PSIO is still connected to your computer by USB and in standby mode, your computer will show “PSIO” mounted under ‘My Computer’ as a physical drive with corrupted looking files and folders. This is because the ARM microcontroller that PSIO contains has a file system embedded within it which we use for proprietary use. Please do not attempt to copy files to this area, nor attempt to format it.
Whilst Windows will deny you from actually carrying out these operations, attempts at doing so may brick or damage your PSIO cartridge and in which case, it will need to be sent back to us for repair.
Next, to transmit data (such as a “*.BIN”, “*.ISO” or “*.IMG” software image), load up the “Systems Console” program (available as a download from the PSIO website). The program will automatically attempt to detect your PSIO Cartridge for you. Once auto-detection has been completed and your cartridge has been mounted, you may now load an image by selecting ‘File’, and then ‘Open and Run Image’.
Note that running images directly will not provide XA/CDDA audio. To enable XA/CDDA audio, you must open and mount the Menu System. To do this, whilst the Menu System is running as a USB image, you must un-mount it once it has booted. This can be done by simply clicking ‘USB’ and then ‘Open the PlayStation Door…’. Now you can re-mount your new desired software image by going to
‘File’ and then ‘Open and Run Image’ again. Note that the Menu System will always show “PlayStation (USB) CD-ROM” as the mounted image name, even when you re-mount with a different image.
Error Codes & Warnings
PSIO Cartridge
Error code: 80000SB0:
There is no Switch Board installed or the Switch Board has not been installed incorrectly. Please check that one has been installed and that the soldering and trace cuts are correct.
Miscellaneous Codes and Warnings:
- An error screen will show saying “NO MENU SYSTEM” if an SD Card is not present or the ‘MENU.SYS’ file is not present on your SD Cards root directory. Note that your PSIO Cartridge will also do this if your parallel port in your PlayStation is dirty or corroded.
- If see error code “AFEHC05L” and the text “INVALID SYSTEM REQUIREMENTS. SOFTWARE TERMINATED.” on your screen, this means your PSIO Cartridge has failed to authenticate and is not running on genuine PlayStation hardware. This error may also happen because you’re using an old ARM firmware on a newer Menu System, or perhaps, you have tampered with your cartridge.
- If you are running non-genuine firmware that was not downloaded from the official PSIO website for your cartridge, you will see a warning window with a countdown timer. This cannot be bypassed. Make sure you download genuine firmware as soon as possible by using your Order ID, Email Address and Serial Number.
Menu System
Error code: 80000014:
There is no controller in Port 1. Please re-insert a PlayStation controller.
Error code: 80000A14:
There is no controller in Port 1, Multi-Tap Port A. Please re-insert a PlayStation controller.
Error code: 80000M14:
The Menu System does not support the PlayStation Mouse. Please re-insert a PlayStation controller.
Error code: 80000G14:
The Menu System does not support the PlayStation Gun (EG: NAMCO G-Con45, Konami Justifier, etcetera) when it is inserted in a Multi-Tap. Please re-insert either the Lightgun or a PlayStation controller directly into the PlayStation controller port.
Error code: 80000F14:
The SCPH-1180 in ‘Green Mode’ (also known as ‘Flight Stick Mode’) isn’t supported. Please change controller modes by pressing the ‘ANALOG’ button on your controller or replace the controller with a standard control pad or DUAL SHOCK controller.
Error code: 80000013:
A different Menu System version was detected on the SD Card. Ensure that the SD Card you recently inserted into your PSIO cartridge has the current matching Menu System version. To check versions, insert your old card and open the Options menu by pressing ‘Triangle’ [Options], scrolling down in the “PSIO Menu System Options” list to “System Information” and pressing ‘Cross’ [Select] to see the string “Menu System: V*.* Build **”.
Error code: 80000012:
Too many files were found on your Secure Digital (SD) Card. Remove the card from PSIO, insert it into your computer and delete some files. You must keep the amount under 1,000 folders in total, including the files in the root directory required for PSIO to boot correctly (IE: “MENU.SYS”). Also be sure to read question 16 in section [10.1].
Error code: 80000010:
You need to manually update your ARM Firmware. Please go to the PSIO website and download the ARM Firmware update and apply it to your PSIO Cartridge. Please read section [8.1: Firmware] for more information requiring this issue.
Error code: 80000011:
No CD-ROM was detected in the PlayStation drive. Open the door, insert a PlayStation format disc and close the door.
Error code: 80000007:
The Flash ROM inside your PSIO cartridge has become corrupted. For security reasons and to keep the integrity of PSIO safe, we will not continue to boot your cartridge.
Please contact us for further assistance.
Error code: 80000005:
No folders were found on your Secure Digital (SD) Card. Please place your PlayStation format game images within a self-contained directory and re-insert your SD Card to continue.
Error code: 80000004:
The Menu System has not passed validation. If you continue to see this error even after restarting your PlayStation, please contact us directly.
Error code: 80000006:
Contact us for further information from the email displayed on your TV screen.
Error code: 80000001:
The Secure Digital (SD) Card has been removed from your PSIO cartridge. Please re-insert an SD Card that contains PlayStation format game images contained within folders to continue.
Error code: 80000FB1:
The Secure Digital (SD) Card has been removed from your PSIO cartridge during the initial setup stage. Please re-insert the same card that contains the same PSIO Menu System to continue.
Error code: 800000U1:
The USB image which was previously mounted by the ‘Systems Console’ program has been unmounted and or the PlayStation CD-ROM drive door has been opened (by simulation). Please re-mount an image to continue.
Error code: 800000C1:
There is no disc in the CD-ROM drive. Please open the drive door on your console, insert a PlayStation format CD-ROM and close the drive door to continue.
Error code: 800000D1:
No PlayStation formatted CD-ROM was detected. To continue loading, please insert a CD-ROM and close the drive door.
Error code: 80000015:
The detected ARM Firmware on your PSIO cartridge is not designed for the Menu System currently running. Please update your PSIO Menu System or your ARM firmware to the version specified on your screen in order to proceed.
Error code: 80000016:
No Menu System has been detected on the SD Card re-inserted. Please copy to the SD Card the same version of the currently running Menu System to continue.
Error code: 80000017:
One of the update files is still present on your SD Card. Please remove the card, delete the corresponding update file (it will tell you what file is causing the problem) and re-insert your SD Card to continue.
Error code: 80000018:
The maximum disc limit has been reached in the MULTIDISC.LST file. Only six (6) images are allowed.
System Loader
If you power on your PlayStation console without an SD Card in your PSIO Cartridge, the ‘System Loader’ will boot which will show the PSIO logo with the text “NO MENU SYSTEM”. To fix this, simply insert an SD Card with the “MENU.SYS” file and press the ‘RESET’ button on your PlayStation console.
Help and Troubleshooting
Generic Questions
Q1) I was trying to play my game, and it froze! Why does this happen?
A1) There are many possibilities why your game may have locked up. One important factor is to ensure that your image has been dumped correctly, and is in fact a direct one-to-one copy from the original CD-ROM. One major problem with most titles is the fact that Sony added copy protection called LibCrypt. If one bit is missing or damaged, the game will not boot. Please read the ‘LibCrypt’ section below.
You should also ensure that all your firmwares are up to date within your PSIO cartridge. More about firmwares may be found under [8.1: Firmware].
Also take caution and notice in ensuring that your PSIO cartridge has been inserted firmly into the PlayStation Parallel Port (‘Parallel I/O’). A corroded or damaged Parallel Port will cause games to lockup and crash if the data connection is not stable, especially if the cartridge is bumped whilst playing. If you suspect your Parallel Port is corroded or damaged (this can be done by visually inspecting it), try using PSIO on a PlayStation with a cleaner or less susceptible damaged Parallel Port.
One consideration to take care is that the SD Card may become fragmented. Now, whilst our programming does handle fragmentation for the SD Card, it is always best to avoid this by safely ejecting your SD Card before removing it from your computer. You can run a ‘Check Disk’ under Windows to scan and fix damaged sectors. Please be patient as the scan usually takes ~25 minutes on a 32GB SD Card. Do not cancel the scan once you have started it, as cancelling will corrupt the card entirely and you will have to copy your games again manually.
If you find your game still freezes, please submit your problem to http://ps-io.com/problem and we will assess it as soon as possible.
Q2) What is LibCrypt and why is it making my game not work?
A2) LibCrypt was Sony’s later method of adding copy protection to prevent piracy. PSIO does not support LibCrypt titles at this time. However, patches are available for most if not all games with LibCrypt. Please see http://ps-io.com/support and look out for the LibCrypt information.
Q3) Does having a ‘Colour Modification’ or ‘Modchip’ installed cause any problems with PSIO?
A3) No. Even with the Switch Board is installed, it will not cause any problems.
Q4) How do I know whether my PlayStation game is a Multi-Disc title?
A4) Please see here (original document has no link).
Q5) Why does my PSIO cartridge get warm after a few hours of playing?
A5) Please see section [7.1].
Q6) When I took my SD Card out it was very hot!
A6) Please see section [7.1].
Q7) Can I use the ‘Game Shark’ image like the Multi-Disc demonstration shows?
A7) You may, but the ‘Game Shark’ image may overwrite the K1 register which will destroy the XA and CDDA audio channels which are part of the EXTDSP logic. Cheats may also adversely affect PSIO which can result in games crashing.
Q8) When I select my game, I get a message saying “No Image Found”.
A8) This happens when no image exists in the directory you’ve created. Make sure you have a BIN, IMG or ISO file in the directory you’re trying to access and try again. It can also mean that the filename you’re trying to mount is greater than 60 chars, or you may have a corrupt SD Card. Please perform a ‘Check Disk’ as mentioned in Q1.
Q9) When I select my game, I get a message saying “High Fragmentation!”.
A9) This happens when your SD Card is in a fragmented state. To fix it, you will have to format your SD Card and re-copy the software image you are trying to boot again. Otherwise, try copying the file again whilst leaving the other file and renaming the extension to something like your initials to help skip this particular sector on your SD Card.
Q10) When I begin the initial PSIO setup and select my desired video mode, my PlayStation crashes!
A10) This happens on a very rare type of PlayStation mainboard model. It is due to the video you have selected not being supported at all and the system actually crashes because of it. To fix it, reboot your PlayStation and select another video mode. Please note that your console will also crash if you change video modes from the Menu System or if you boot a software title that is hard-coded to use that video mode.
Q11) Why isn’t the ‘Burn-In Timer’ triggering?
A11) An error might be displaying or the controller is pressing a button which is not allowing the timer logic to trip.
Q12) Should I care if my folders/file are flagged as ‘Hidden’, ‘Archive’ or ‘Read-Only’?
A12) No. All files will display and be detected no matter what their flag state is.
Q13) Do I need a working CD-ROM drive for PSIO to function?
A13) No. You don’t need a functioning CD-ROM drive. You can even remove the drive if you would like.
Q14) Why is my game in black and white?
A14) If you play a PAL game on an NTSC PlayStation (and vice-versa), the colour carrier signal may be missing if you play via composite video. Instead, please use RGB out or colour modify your PlayStation mainboard. Note that the ‘Colour Modification’ will require a TV which supports PAL50 and/or PAL60.
Q15) Does PSIO support CloneCD (*.CCD) or Sub Information Track Data (*.SBI) files?
A15) No.
Q16) Why do I get error code 80000012 when I have the exact amount that’s required?
A16) Ensure that you have checked your SD Card for any hidden or system protected files and/or directories.
Q17) Wait, I have more questions!
A17) Please see our FAQ on our website, or send us a message via our website if we have not answered one of your questions.
General
If you cannot find your problem listed below, or if you have any other issues, queries or concerns with your PSIO cartridge, please let us know directly on our website and we will assist your further.
Problem A
When I select my software image, nothing happens.
Solution A
Ensure that your software filename does not exceed 60 characters.
Problem B
When I plug in my PSIO Cartridge, it boots to the PlayStation BIOS menu.
Solution B
Make sure that you have installed the Switch Board correctly and that you have the “MENU.SYS” file in the root of your exFAT or FAT32 formatted SD Card. Also ensure that your PlayStation’s Parallel Port (Parallel I/O) is not corroded nor damaged by visually inspecting it.
Problem C
I can’t boot my original games from the CD-ROM drive!
Solution C
Ensure that the Switch Board is properly installed. Also check that your PlayStation laser is not damaged and is functional.
Problem D
My software images are not playing any audio. I don’t hear any music or background audio.
Solution D
Many software images use “Compact Disc Digital Audio” (CDDA). To make CDDA work, please See section [5].
Development Usage
PlayStation Programming with PSIO
The libraries for specific use of development with PSIO are currently not released as they are in development.