
Last Updated: 5th March 2021
DCDigital Firmware Update Information
Table of Contents
Firmware Parts
The Firmware consists of 3 parts:
1 FPGA firmware
FPGA firmware comes in 3 different file types:
.dcBinary configuration for WiFi/Web console update.DCxPlus-v2.dcNewer style firmware package containing bothstdandhq2xfirmware. This is used in firmware > v4.0.DCxPlus-default.dcLegacy firmware package for firmware < v4.0.
.jicActive serial configuration file for use with programmer (e.g. USBBlaster).Obsolete as the production DCHDMI does not have the JTAG connector on board.DCxPlus-hq2x.jicStandard firmwareDCxPlus-std.jicRelaxed firmware
.rbfRaw binary configuration file.DCxPlus-hq2x.rbfStandard firmwareDCxPlus-std.rbfRelaxed firmware
.dcfile(s)
2 ESP firmware
4MB-firmware.binESP firmware.4MB-littlefs.binESP Filesystem image. Used for initial programming.
ESP web console
esp.index.html.gzWeb consoleindex.html
Files used by WiFi update
https://dc.i74.de/fw/<branch>/DCxPlus-v2.dc(> v4.0)orhttps://dc.i74.de/fw/<branch>/DCxPlus-default.dc(< v4.0)
Important
If you want to manually update your firmware as described here, make sure all 3 files are from the same branch.
Firmware Branches
Available firmware versions (branches) (aka Firmware Version in Web console setup)
master
Stable branch. This is the recommended setting for most users.
develop
Development branch. Release candidates are released here.
experimental
Experimental branch. Alpha/Beta versions are released here. Use with caution!
Bleeding
Bleeding edge branch. Daily builds and features in development is done here.
Use with extreme caution, as these may require restoring from a bricked console via serial port!
vX.Y
Previously released firmware versions.
hq2x-<branch> / std-<branch>
These are legacy branches, if doing a WiFi update from a v2.3.x or v3.0.x firmware.
How to Update Manually
Download the firmware files to your computer:
Unified FPGA firmware:
If your Firmware is v4.0 or above download:
If your Firmware is below v4.0 download this Transitional FPGA Firmware:
ESP firmware:
Web console:
- Open the OSD and enter the
WiFi Setuppage. - Make sure it says
[Access point]on the screen.
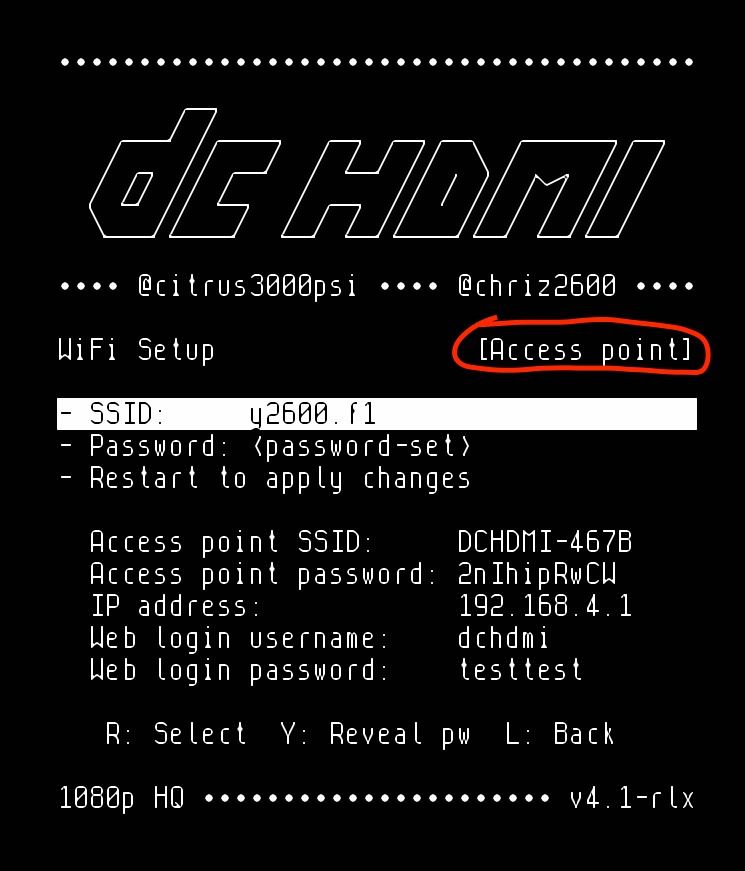
- Press
Yto reveal passwords.
To be able to connect to the DCHDMI access point you will need the information marked red.
For web console access you will need the information marked yellow.
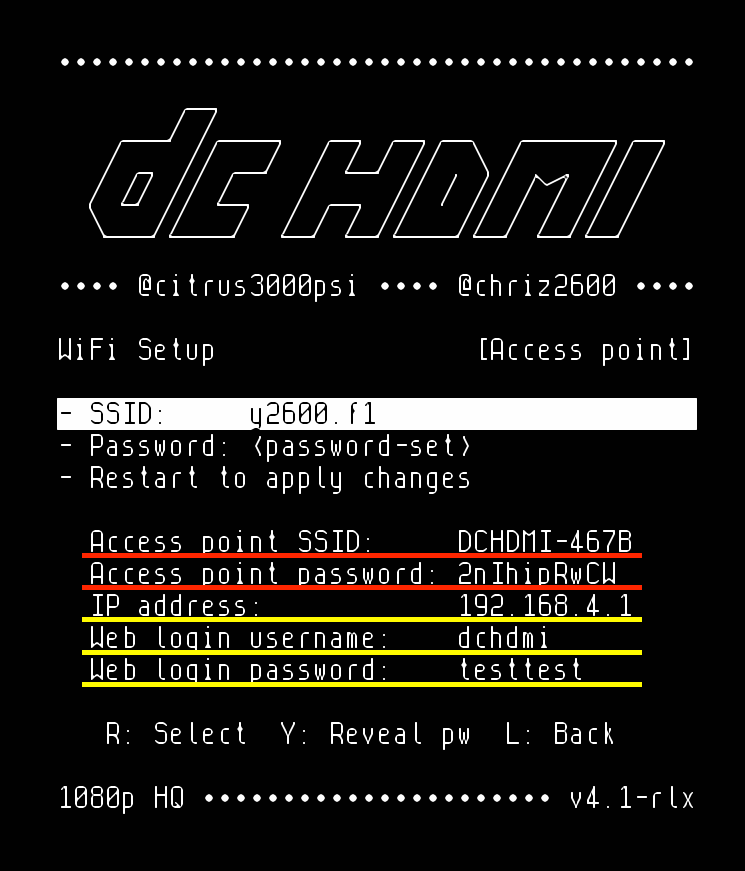
- Connect your WiFi capable computer to the DCHDMI access point using:
- SSID:
Access point SSID - Password:
Access point password
- SSID:
- When connected to DCHDMI AP, use a browser of your choice and enter
192.168.4.1in the browsers address bar. - The Web console should be displayed and setup mode should be started. Just hit
CTRL-Dto exit the setup. - If your current firmware is v4.0 or newer:
Use theselectcommand and select the previously downloaded Unified FPGA firmware (DCxPlus-v2.dc) from the file chooser.If your current firmware isn’t v4.0 or newer:
Use theselectcommand and select the previously downloaded Transitional FPGA firmware (DCxPlus-default.dc) from the file chooser. uploadfpgato upload the file.- Use
selectagain to select the previously downloaded ESP firmware (4MB-firmware.bin). uploadespto upload.- Use
selectonce again to select the Web console (esp.index.html.gz) file. - And upload it using
uploadindex. - Now use
flashto flash/apply all files to your DCHDMI. resetDCHDMI to (re-)start with the new firmware- Only if you upgraded from a version before v4.0:
- Use the
selectcommand and select Unified FPGA firmware (DCxPlus-v2.dc) from the file chooser. uploadfpgato upload the file.- You’re now able to switch between
StandardandRelaxed.
- Use the
Commands
Basic commands
| Command | Description |
|---|---|
| config | Show current DCHDMI configuration data |
| setup | Enter setup mode, to edit configuration |
| check | Check for new firmware using Firmware Server and Firmware Version configuration data |
| download | Download firmware from Firmware Server to staging area |
| flash | Flash firmware from staging area |
| reset | Reset DCHDMI. This also resets the Dreamcast |
| help | Show available basic commands |
| helpexpert | Show available expert commands |
| clear | Clear terminal screen |
| exit | Exit terminal |
Expert commands
| Command | Description |
|---|---|
| check[type](1) | Check for new type firmware using Firmware Server and Firmware Version configuration data |
| select | Select a file to upload from your computer |
| upload[type] | Upload selected file to staging area for type |
| file | Print information about selected file |
| download[type] | Download type firmware from Firmware Server to staging area |
| flash[type] | Flash type from staging area |
| reset[type](2) | Reset type |
| cleanup | Remove all staged firmware files and forget about previously flashed versions |
| ls | List files in filesystem |
(1) [type]: fpga, esp or index
(2) There is no resetindex command
Special commands
| Command | Description |
|---|---|
| flashfpgasecure | Flash FPGA firmware while disabling the FPGA |
| banner | Print DCHDMI banner |
| get_mac | Print MAC address of DCHDMI |
| flash_chip_size | Print ESP flash chip size |
| res_[resolution](1) | Switch to resolution |
| deinterlace_[deint](2) | Use deinterlacer deint (only works in 15kHz mode) |
| generate_on | Generate test video image |
| generate_off | Disable test video image |
| testdata | Shows test screen |
| resetpll | Reset PLL |
| osd (on,off) | Show/hide OSD |
| hq2x (on,off) | Activate/deactivate HQ2X filter (only in 960p/1080p mode with Relaxed firmware active) |
| 240p_offset ([0-9]+) | Set offset for 240p mode (pixel x2) |
| osd (on,off) | Show/hide OSD |
| spi_flash_erase | Erase FPGA configuration memory |
osdwrite\[column]\[row]\"[text]" | Write [text] to OSD starting at [column]/[row] |
(1) [resolution]: vga, 480p, 960p or 1080p
(2) [deint]: bob or passthru